Notes on XCTest for iOS UI testing
This is a catalog of random info I discovered when working with XCTest for iOS apps. XCTest is the Apple-backed framework for UI tests, which I have used for both Interchange and where is birb (still in development). Keep in mind that these are takeaways from my experience, and I still have a lot to learn. If anyone has suggestions for how something should actually be done, please let me know!
What is testable?
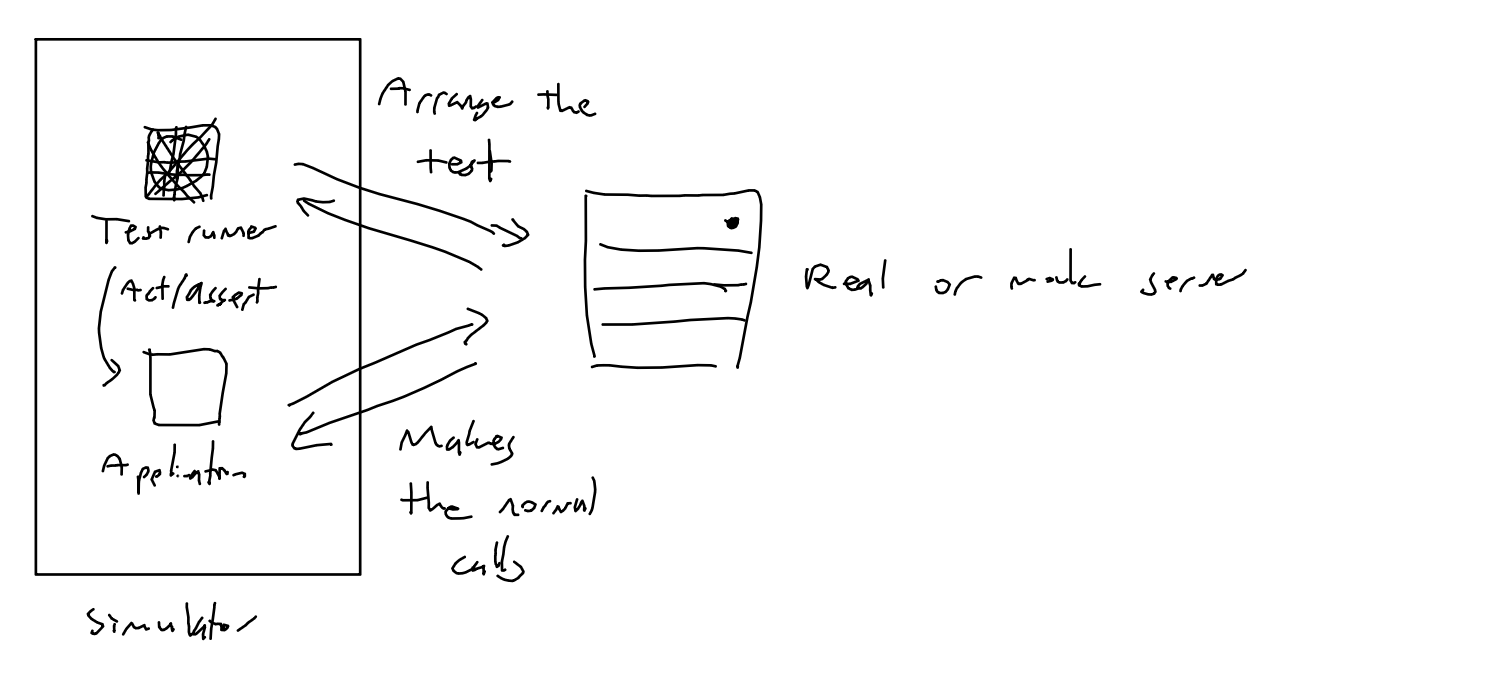
On iOS, UI testing is fundamentally different from unit testing. With unit tests, you test directly against internal APIs defined within the app: think models, view models, and other objects along the way.
With UI tests, there is almost no access to any of an app’s internals. Tests run in an isolated test runner which gets installed alongside your app. This makes sense in theory, especially in context to the testing pyramid. However, it also complicates the setup.
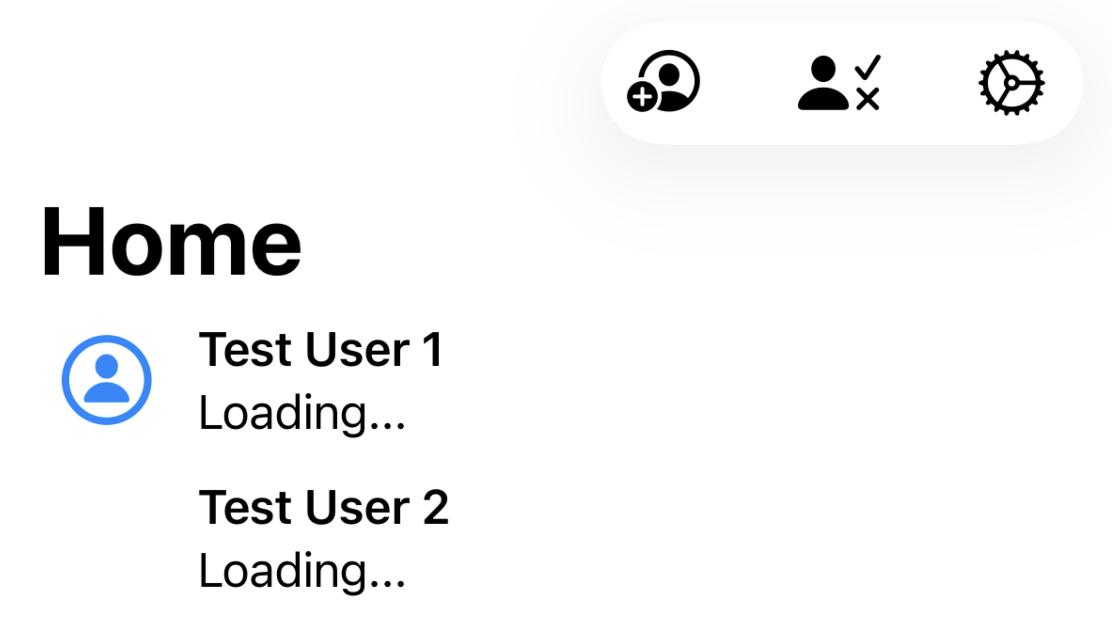
Take this example: in where is birb, the home screen makes a network call to get a list of friends. When unit testing this screen’s view model, you might use URLSession.stubbed(…) to inject a session which returns a custom response. For UI tests, it’s impossible to change this state as the test runner is far removed from the internal app state. This begs the question: how do you check that the friends list renders correctly if you don’t tell it what to render?
About the only thing you can pass to the app is UserDefaults options. However, it’s generally ill-advised to put too much logic that only runs during a UI test.
The approach I took to resolve this was to treat it like an end-to-end or integration test: tell the backend server what the app should load. Either have the real backend server running alongside the app, or have a server where the test runner can simulate responses. where is birb uses the first approach, while Interchange uses the latter.
Social sign-in
where is birb only offers social sign-in with Apple and Google, but I still needed a way to test the app. I avoided testing social sign-in flows entirely, and decided to create a UI test-specific flow for for generating a mock user. While this goes against not creating UI test-specific paths, this is one place where I thought it made sense.
This avoids dependency on the social providers, where we would otherwise have to use, say, a Google test account.
Clipboard permissions
Both Interchange and where is birb make use of the pasteboard, whether it’s copying a share link or the address of a parking lot. It’s easy to fall into the trap of directly checking the user’s pasteboard in the test runner:
let contents = UIPasteboard.general.string
However, this will lock up the test. If the simulator is open, there might be a dialog asking for pasteboard permission. It’s not like you can use addUIInterruptionMonitor here, because the dialog is caused by the test runner itself.
Instead, for both apps I pasted whatever string I copied into Spotlight, asserting the existence of the string there.
Universal links
When implementing universal links, it makes sense to test that it works in a UI test, right? XCTest actually has a dedicated method to open any link in its default app:
XCUIDevice.shared.system.open(url)
The major consideration is that the Apple app-domain association file can take several seconds to download after the simulator boots. Not having this file downloaded can cause the link to open in Safari instead, like in this failed test run:
CI/CD
This has been the biggest hurdle for me thus far. Not only are Macs expensive (they’re required for building iOS apps), but choice of hardware can impact how the tests run.
I use GitHub Actions, and a macOS runner there is 10x the cost of an Ubuntu-based runner. Going the self-hosted CI route requires owning additional Mac hardware, as per Apple’s EULA. Other solutions (e.g. MacStadium) are also quite costly.
The hardware limitations of a CI runner can often cause the simulator to lag. Here’s an example of what mock user sign-in looks like on the GitHub CI runner:
From what I’ve researched, the way to handle this is to use timeouts via waitForExistence. While I’ve mostly gotten used to this idea by now, I still feel like there’s a less flaky way to handle this. At the very least, I could create a default for how long to wait for an element; I plan on going back back and tweaking the tests this way.
There’s still more to learn
Even with its flaws, I prefer the control of XCTest over other solutions like Appium and Maestro, and also like not having a third-party dependency. I’ll probably write another one of these as I encounter more blockers/use cases.